$ cat /etc/lsb-release
DISTRIB_ID=Ubuntu
DISTRIB_RELEASE=18.04
DISTRIB_CODENAME=bionic
DISTRIB_DESCRIPTION="Ubuntu 18.04.4 LTS"
$ uname -r
4.15.0-76-generic
$ dpkg -l | egrep "(radvd|dnsmasq|isc-dhcp-client)"
ii  dnsmasq                         2.79-1                              all          Small caching DNS proxy and DHCP/TFTP server
ii  dnsmasq-base                    2.79-1                              amd64        Small caching DNS proxy and DHCP/TFTP server
ii  isc-dhcp-client                 4.3.5-3ubuntu7.1                    amd64        DHCP client for automatically obtaining an IP address
ii  radvd                           1:2.16-3                            amd64        Router Advertisement Daemon
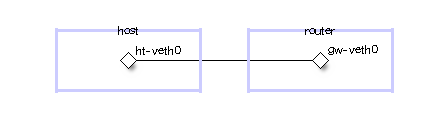
$ sudo ip netns add host
$ sudo ip netns add router
そして、Network Namespace 同士をつなぐ veth インターフェイスを作る。
$ sudo ip link add ht-veth0 type veth peer name gw-veth0
作ったインターフェイスを Network Namespace に所属させる。
$ sudo ip link set ht-veth0 netns host
$ sudo ip link set gw-veth0 netns router
デフォルトでは EUI-64 を使ってアドレスの下位 64 ビットが生成されるため、わかりやすいように MAC アドレスを変更しておく。
$ sudo ip netns exec host ip link set dev ht-veth0 address 00:00:5E:00:53:01
$ sudo ip netns exec router ip link set dev gw-veth0 address 00:00:5E:00:53:02
veth インターフェイスの状態を UP に設定する。
$ sudo ip netns exec host ip link set ht-veth0 up
$ sudo ip netns exec router ip link set gw-veth0 up
$ sudo ip netns exec host ip address show dynamic ht-veth0
11: ht-veth0@if10: <BROADCAST,MULTICAST,UP,LOWER_UP> mtu 1500 qdisc noqueue state UP group default qlen 1000
    link/ether 00:00:5e:00:53:01 brd ff:ff:ff:ff:ff:ff link-netnsid 1
    inet6 2001:db8::200:5eff:fe00:5301/64 scope global dynamic mngtmpaddr
       valid_lft 86379sec preferred_lft 14379sec
また、同時にルータ広告を送ってきたリンクローカルアドレスにデフォルトルートを設定する。
$ sudo ip netns exec host ip -6 route show
2001:db8::/64 dev ht-veth0 proto kernel metric 256 expires 86388sec pref medium
fe80::/64 dev ht-veth0 proto kernel metric 256 pref medium
default via fe80::1 dev ht-veth0 proto ra metric 1024 expires 1788sec hoplimit 64 pref medium
RDNSS の設定を追加してみる
RA の基本的な動作が確認できたので、つづいては RDNSS の設定を追加してパケットを観察してみる。
radvd の設定ファイルに RDNSS の設定を追加する。
配布する DNS サーバのアドレスは 2001:db8::dead:beef に指定した。
$ sudo ip netns add ns1
$ sudo ip netns add router
$ sudo ip netns add ns2
つづいて veth インターフェイスを用意する。
$ sudo ip link add ns1-veth0 type veth peer name gw-veth0
$ sudo ip link add ns2-veth0 type veth peer name gw-veth1
作成した veth インターフェイスを Network Namespace に所属させていく。
$ sudo ip link set ns1-veth0 netns ns1
$ sudo ip link set gw-veth0 netns router
$ sudo ip link set gw-veth1 netns router
$ sudo ip link set ns2-veth0 netns ns2
インターフェイスの状態を UP に設定する。
$ sudo ip netns exec ns1 ip link set ns1-veth0 up
$ sudo ip netns exec router ip link set gw-veth0 up
$ sudo ip netns exec router ip link set gw-veth1 up
$ sudo ip netns exec ns2 ip link set ns2-veth0 up
インターフェイスに IP アドレスを付与する。
$ sudo ip netns exec ns1 ip address add 192.0.2.1/24 dev ns1-veth0
$ sudo ip netns exec router ip address add 192.0.2.254/24 dev gw-veth0
$ sudo ip netns exec router ip address add 198.51.100.254/24 dev gw-veth1
$ sudo ip netns exec ns2 ip address add 198.51.100.1/24 dev ns2-veth0
ns1 と ns2 のデフォルトルートを router の IP アドレスに向ける。
$ sudo ip netns exec ns1 ip route add default via 192.0.2.254
$ sudo ip netns exec ns2 ip route add default via 198.51.100.254
rotuer がルータとして動作するようにカーネルパラメータを設定する。
$ sudo ip netns exec router sysctl net.ipv4.ip_forward=1
ひとまず、通常のルーティングが動作することを確認しておく。
$ sudo ip netns exec ns1 ping -c 3198.51.100.1 -I 192.0.2.1
PING 198.51.100.1 (198.51.100.1) from 192.0.2.1 :56(84) bytes of data.
64 bytes from 198.51.100.1: icmp_seq=1 ttl=63time=0.217 ms
64 bytes from 198.51.100.1: icmp_seq=2 ttl=63time=0.043 ms
64 bytes from 198.51.100.1: icmp_seq=3 ttl=63time=0.191 ms
--- 198.51.100.1 ping statistics ---
3 packets transmitted, 3 received, 0% packet loss, time 2026ms
rtt min/avg/max/mdev = 0.043/0.150/0.217/0.077 ms
$ sudo ip netns exec ns1 \
     ip link add ns1-vxlan0 \
     type vxlan \
     id 100 \
     remote 198.51.100.1 \
     dstport 4789 \
     dev ns1-veth0
つづいて ns2 にも VXLAN インターフェイスを作る。
$ sudo ip netns exec ns2 \
     ip link add ns2-vxlan0 \
     type vxlan \
     id 100 \
     remote 192.0.2.1 \
     dstport 4789 \
     dev ns2-veth0
あとは、作った VXLAN インターフェイスに IP アドレスを付与したら状態を UP に設定するだけ。
$ sudo ip netns exec ns1 ip link set ns1-vxlan0 up
$ sudo ip netns exec ns1 ip address add 203.0.113.1/24 dev ns1-vxlan0
$ sudo ip netns exec ns2 ip link set ns2-vxlan0 up
$ sudo ip netns exec ns2 ip address add 203.0.113.2/24 dev ns2-vxlan0
パケットキャプチャするために ns2 のインターフェイスに tcpdump をしかけておく。
$ sudo ip netns exec ns2 tcpdump -tnl -i ns2-veth0
tcpdump: verbose output suppressed, use -v or -vv for full protocol decode
listening on ns2-veth0, link-type EN10MB (Ethernet), capture size 262144 bytes
Virtualization core: Support for nested hardware-virtualization on Intel CPUs (starting with 5th generation Core i, codename Broadwell), so far tested only with guest running VirtualBox
どうやら、Intel であれば第 5 世代 Core i 以降の CPU で仮想化支援機能を使った Nested Virtualization ができるようになったらしい。
このニュースは、個人的に感慨深いものだった。
というのも、次のチケットを見てもらいたい。
$ sw_vers
ProductName:    Mac OS X
ProductVersion: 10.14.6
BuildVersion:   18G2022
$ sysctl -a | grep brand_string
machdep.cpu.brand_string: Intel(R) Core(TM) m3-7Y32 CPU @ 1.10GHz
$ vagrant version | head -n 1
Installed Version: 2.2.7
$ vboxmanage | head -n 1
Oracle VM VirtualBox Command Line Management Interface Version 6.1.2
$ head Vagrantfile# -*- mode: ruby -*-# vi: set ft=ruby :# All Vagrant configuration is done below. The "2" in Vagrant.configure# configures the configuration version (we support older styles for# backwards compatibility). Please don't change it unless you know what# you're doing.Vagrant.configure("2") do |config|
# The most common configuration options are documented and commented below.# For a complete reference, please see the online documentation at
ここで、設定ファイルを編集する必要がある。
ポイントは最後の vb.customize に渡している引数の --nested-hw-virt on で、これがないと L1 の仮想マシンで CPU の仮想化支援機能が有効にならない。
あと、Nested Virtulization をするには、かなり処理のオーバーヘッドがあるので仮想マシンのリソースは多めに確保しておいた方が良い。
  config.vm.provider "virtualbox" do |vb|
    vb.cpus = "2"
    vb.memory = "2048"
    vb.customize ["modifyvm", :id, "--nested-hw-virt", "on"]
  end


 DDR4 2400MT/s(PC4-19200) CL17 SODIMM 260pin CT2K8G4SFS824A")
 2400MB/s Write (Max) 1750MB/s PCIe Gen3 M.2 2280 国内正規代理店品 WDS500G2B0C")

 5年保証 【PlayStation4 動作確認済】 正規代理店保証品 CT500MX500SSD1/JP")


")
