BIRD 1 は The BIRD Internet Routing Daemon の略で、ルーティングプロトコルを実装した OSS のひとつ。 今回は、そんな BIRD を Network Namespace と組み合わせてスタティックルーティング (静的経路制御) の設定をしてみる。 なお、今回試す内容は ip(8) を使えば一行のコマンドラインで実行できるくらいシンプルなものになっている。 つまり、ごく単純な例で BIRD の基本的な使い方を確認する側面が強い。 現在 (2023-06-15) の BIRD はバージョン 1 系と 2 系が平行してメンテナンスされているが、今回使うのはバージョン 2 系である。
使った環境は次のとおり。
$ cat /etc/lsb-release
DISTRIB_ID=Ubuntu
DISTRIB_RELEASE=22.04
DISTRIB_CODENAME=jammy
DISTRIB_DESCRIPTION="Ubuntu 22.04.2 LTS"
$ uname -srm
Linux 5.15.0-73-generic aarch64
$ bird --version
BIRD version 2.0.8
もくじ
下準備
まずは BIRD のバージョン 2 系をインストールする。
$ sudo apt-get update
$ sudo apt-get install bird2
インストールすると同時に BIRD のサービスが動作し始める。 しかし、今回は systemd 経由では BIRD を使わないため止めておく。
$ sudo systemctl stop bird
$ sudo systemctl disable bird
ネットワークを構築する
はじめに Network Namespace を使ってネットワークを構築する。 今回作るのは、以下のようなネットワークになる。
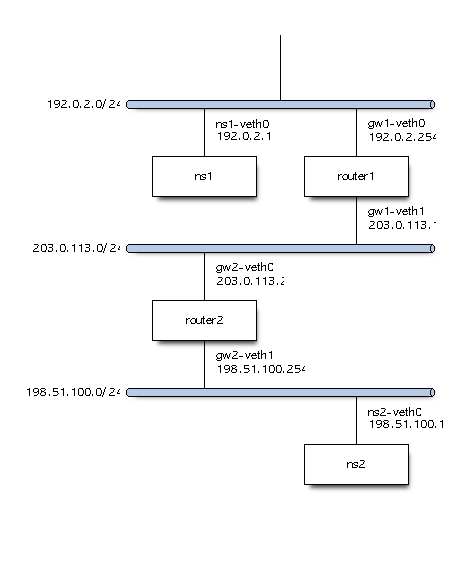
登場するネットワークセグメントは次の 3 つ。
- 192.0.2.0/24
- 203.0.113.0/24
- 198.51.100.0/24
ここで、router1 は 198.51.100.0/24 と直接はつながっていないため経路を知らない。
同様に、router2 は 192.0.2.0/24 と直接はつながっていないため経路を知らない。
そこで、BIRD を使ってスタティックルーティングで経路を設定するのが今回の目的になる。
まずは Network Namespace を用意する。
$ sudo ip netns add ns1
$ sudo ip netns add router1
$ sudo ip netns add router2
$ sudo ip netns add ns2
Network Namespace 間をつなぐ Virtual Ethernet Device のインターフェイスを用意する。
$ sudo ip link add ns1-veth0 type veth peer name gw1-veth0
$ sudo ip link add gw1-veth1 type veth peer name gw2-veth0
$ sudo ip link add gw2-veth1 type veth peer name ns2-veth0
作成したインターフェイスを Network Namespace に所属させる。
$ sudo ip link set ns1-veth0 netns ns1
$ sudo ip link set gw1-veth0 netns router1
$ sudo ip link set gw1-veth1 netns router1
$ sudo ip link set gw2-veth0 netns router2
$ sudo ip link set gw2-veth1 netns router2
$ sudo ip link set ns2-veth0 netns ns2
それぞれのインターフェイスをリンクアップさせる。
$ sudo ip netns exec ns1 ip link set ns1-veth0 up
$ sudo ip netns exec router1 ip link set gw1-veth0 up
$ sudo ip netns exec router1 ip link set gw1-veth1 up
$ sudo ip netns exec router2 ip link set gw2-veth0 up
$ sudo ip netns exec router2 ip link set gw2-veth1 up
$ sudo ip netns exec ns2 ip link set ns2-veth0 up
それぞれのインターフェイスに IP アドレスを付与する。
$ sudo ip netns exec ns1 ip address add 192.0.2.1/24 dev ns1-veth0
$ sudo ip netns exec router1 ip address add 192.0.2.254/24 dev gw1-veth0
$ sudo ip netns exec router1 ip address add 203.0.113.1/24 dev gw1-veth1
$ sudo ip netns exec router2 ip address add 203.0.113.2/24 dev gw2-veth0
$ sudo ip netns exec router2 ip address add 198.51.100.254/24 dev gw2-veth1
$ sudo ip netns exec ns2 ip address add 198.51.100.1/24 dev ns2-veth0
ホストに相当する Network Namespace にはデフォルトルートを設定しておく。
$ sudo ip netns exec ns1 ip route add default via 192.0.2.254
$ sudo ip netns exec ns2 ip route add default via 198.51.100.254
そして、ルータになる Network Namespace は IPv4 のルーティングを有効にする。
$ sudo ip netns exec router1 sysctl net.ipv4.ip_forward=1
$ sudo ip netns exec router2 sysctl net.ipv4.ip_forward=1
この状態で、それぞれのルータは自身が直接つながっているセグメントへの経路は把握している。
$ sudo ip netns exec router1 ip route show
192.0.2.0/24 dev gw1-veth0 proto kernel scope link src 192.0.2.254
203.0.113.0/24 dev gw1-veth1 proto kernel scope link src 203.0.113.1
しかし、直接つながっていないセグメントへの経路がないため ns1 から ns2 の間で ping(8) は通らない。
$ sudo ip netns exec ns1 ping -c 3 198.51.100.1 -I 192.0.2.1
PING 198.51.100.1 (198.51.100.1) from 192.0.2.1 : 56(84) bytes of data.
From 192.0.2.254 icmp_seq=1 Destination Net Unreachable
From 192.0.2.254 icmp_seq=2 Destination Net Unreachable
From 192.0.2.254 icmp_seq=3 Destination Net Unreachable

--- 198.51.100.1 ping statistics ---
3 packets transmitted, 0 received, +3 errors, 100% packet loss, time 2041ms
ここからは router1 と router2 に BIRD でスタティックルートを設定していく。
router1 の BIRD を設定する
まずは router1 の BIRD を設定する。
BIRD は 1 つの設定ファイルさえあれば動作する。
以下が、その設定ファイルである。
$ cat << 'EOF' > router1.conf
log syslog all;
log stderr all;
log "/var/log/bird-router1.log" all;
debug protocols all;

router id 203.0.113.1;

protocol device {
}

protocol static {
    ipv4;
    route 198.51.100.0/24 via 203.0.113.2;
}

protocol kernel {
    ipv4 {
        export all;
    };
}
EOF
上記で、以下の部分は BIRD で試行錯誤する際に有用な設定になっている。 ようするに、色んなログをデバッグ用に出してくれ、という感じ。
log syslog all;
log stderr all;
log "/var/log/bird-router1.log" all;
debug protocols all;
以下はルータの識別子で、一般的にはルータの IPv4 アドレスを指定する。 なくても動作するようだが、明示的に設定することが推奨されている。
router id 203.0.113.1;
以下の device プロトコルは、とりあえず書いておかないと BIRD が動作しない。
ここでの「プロトコル」というのは、通信上のプロトコルだけでなく、BIRD がデータをやり取りする対象のような意味になっている。
たとえば device は BIRD が動作している NIC の刺さったコンピュータのような意味になる。
protocol device {
}
以下の static プロトコルが、今回の主題となるスタティックルーティングを司る部分になる。
ここでは IPv4 で 198.51.100.0/24 には 203.0.113.2 を経由して到達できることを示している。
protocol static {
    ipv4;
    route 198.51.100.0/24 via 203.0.113.2;
}
以下の kernel プロトコルは、カーネルのルーティングテーブルと BIRD がやり取りする情報について記載している。
BIRD では、例外はあるものの各プロトコルについて import と export を、どのように処理するか指定する。
import は「その対象からデータを取得すること」で、export は「その対象へデータを伝達すること」を意味する。
たとえば kernel の ipv4 に export all しているということは「BIRD の知っている経路をすべてカーネルのルーティングテーブルへ伝達せよ」という意味になる。
protocol kernel {
    ipv4 {
        export all;
    };
}
設定ファイルができたので router1 上で bird(8) を実行する。
$ sudo ip netns exec router1 bird \
    -c router1.conf \
    -s router1.ctl \
    -P router1.pid
オプションは、それぞれ次のような意味になる。
-c- 設定ファイルのパスを指定する
-s- 制御用ソケットファイルのパスを指定する
-P- PID ファイルのパスを指定する
上記のオプションで実行するとプロセスはデーモンになる。
もしフォアグラウンドで実行したいときは -f オプションや -d オプションを付けると良い。
実行したら birdc コマンドで動作状況を確認する。
-s オプションには、先ほど指定した制御用ソケットファイルのパスを指定しよう。
たとえば show route コマンドで BIRD が把握している経路を確認できる。
$ sudo birdc show route -s router1.ctl
BIRD 2.0.8 ready.
Table master4:
198.51.100.0/24      unicast [static1 18:45:46.510] * (200)
    via 203.0.113.2 on gw1-veth1
上記で master4 というテーブルは BIRD の IPv4 用のデフォルトのルーティングテーブルになっている。
そこに、設定した経路が入っていることが分かる。
少し分かりにくいのは、BIRD のルーティングテーブルというのは、カーネルのルーティングテーブルとは異なる点である。 BIRD のルーティングテーブルは、あくまで BIRD が把握している経路に過ぎず、ここにあったとしてもパケットが転送できるわけではない。
ip(8) の route show を使うことで、カーネルのルーティングテーブルが確認できる。
ここに経路があって、初めてパケットを転送できるようになる。
ここに経路を反映するために、先ほど kernel プロトコルに export を設定したわけだ。
$ sudo ip netns exec router1 ip route show
192.0.2.0/24 dev gw1-veth0 proto kernel scope link src 192.0.2.254
198.51.100.0/24 via 203.0.113.2 dev gw1-veth1 proto bird metric 32
203.0.113.0/24 dev gw1-veth1 proto kernel scope link src 203.0.113.1
次のとおり、ちゃんと BIRD で設定した経路が入っているようだ。
198.51.100.0/24 via 203.0.113.2 dev gw1-veth1 proto bird metric 32
また、birdc コマンドの show protocols all を使うと、BIRD のそれぞれのルーティングテーブルの状況が確認できる。
$ sudo birdc show protocols all -s router1.ctl
BIRD 2.0.8 ready.
Name       Proto      Table      State  Since         Info
device1    Device     ---        up     18:45:46.510

static1    Static     master4    up     18:45:46.510
  Channel ipv4
    State:          UP
    Table:          master4
    Preference:     200
    Input filter:   ACCEPT
    Output filter:  REJECT
    Routes:         1 imported, 0 exported, 1 preferred
    Route change stats:     received   rejected   filtered    ignored   accepted
      Import updates:              1          0          0          0          1
      Import withdraws:            0          0        ---          0          0
      Export updates:              0          0          0        ---          0
      Export withdraws:            0        ---        ---        ---          0

kernel1    Kernel     master4    up     18:45:46.510
  Channel ipv4
    State:          UP
    Table:          master4
    Preference:     10
    Input filter:   ACCEPT
    Output filter:  ACCEPT
    Routes:         0 imported, 1 exported, 0 preferred
    Route change stats:     received   rejected   filtered    ignored   accepted
      Import updates:              0          0          0          0          0
      Import withdraws:            0          0        ---          0          0
      Export updates:              1          0          0        ---          1
      Export withdraws:            0        ---        ---        ---          0
router2 の BIRD を設定する
同様に router2 の BIRD も設定しよう。
まずは設定ファイルを用意する。
先ほどの router1 と一部の値を除いてほとんど変わらない。
$ cat << 'EOF' > router2.conf
log syslog all;
log stderr all;
log "/var/log/bird-router2.log" all;
debug protocols all;

router id 203.0.113.2;

protocol device {
}

protocol static {
    ipv4;
    route 192.0.2.0/24 via 203.0.113.1;
}

protocol kernel {
    ipv4 {
        export all;
    };
}
EOF
router2 の Network Namespace 上で BIRD を起動する。
$ sudo ip netns exec router2 bird \
    -c router2.conf \
    -s router2.ctl \
    -P router2.pid
設定された経路を確認していく。 問題ないようだ。
$ sudo birdc show route -s router2.ctl
BIRD 2.0.8 ready.
Table master4:
192.0.2.0/24         unicast [static1 18:46:49.494] * (200)
    via 203.0.113.1 on gw2-veth0
$ sudo ip netns exec router2 ip route show
192.0.2.0/24 via 203.0.113.1 dev gw2-veth0 proto bird metric 32
198.51.100.0/24 dev gw2-veth1 proto kernel scope link src 198.51.100.254
203.0.113.0/24 dev gw2-veth0 proto kernel scope link src 203.0.113.2
$ sudo birdc show protocols all -s router2.ctl
BIRD 2.0.8 ready.
Name       Proto      Table      State  Since         Info
device1    Device     ---        up     18:46:49.494

static1    Static     master4    up     18:46:49.494
  Channel ipv4
    State:          UP
    Table:          master4
    Preference:     200
    Input filter:   ACCEPT
    Output filter:  REJECT
    Routes:         1 imported, 0 exported, 1 preferred
    Route change stats:     received   rejected   filtered    ignored   accepted
      Import updates:              1          0          0          0          1
      Import withdraws:            0          0        ---          0          0
      Export updates:              0          0          0        ---          0
      Export withdraws:            0        ---        ---        ---          0

kernel1    Kernel     master4    up     18:46:49.494
  Channel ipv4
    State:          UP
    Table:          master4
    Preference:     10
    Input filter:   ACCEPT
    Output filter:  ACCEPT
    Routes:         0 imported, 1 exported, 0 preferred
    Route change stats:     received   rejected   filtered    ignored   accepted
      Import updates:              0          0          0          0          0
      Import withdraws:            0          0        ---          0          0
      Export updates:              1          0          0        ---          1
      Export withdraws:            0        ---        ---        ---          0
動作を確認する
これで、BIRD を通して router1 と router2 に経路が設定された。
あとは、最初に動作しなかった ns1 と ns2 の間で ping を打ってみよう。
$ sudo ip netns exec ns1 ping -c 3 198.51.100.1 -I 192.0.2.1
PING 198.51.100.1 (198.51.100.1) from 192.0.2.1 : 56(84) bytes of data.
64 bytes from 198.51.100.1: icmp_seq=1 ttl=62 time=0.167 ms
64 bytes from 198.51.100.1: icmp_seq=2 ttl=62 time=0.186 ms
64 bytes from 198.51.100.1: icmp_seq=3 ttl=62 time=0.202 ms

--- 198.51.100.1 ping statistics ---
3 packets transmitted, 3 received, 0% packet loss, time 2162ms
rtt min/avg/max/mdev = 0.167/0.185/0.202/0.014 ms
ちゃんと疎通できた。
まとめ
今回は BIRD (The BIRD Internet Routing Daemon) を Network Namespace で作ったネットワーク上で動かしてスタティックルーティングの設定を試してみた。
