BIRD 1 は The BIRD Internet Routing Daemon の略で、ルーティングプロトコルを実装した OSS のひとつ。 今回は、そんな BIRD を Network Namespace と組み合わせて OSPFv2 を使ったダイナミックルーティングを設定をしてみる。 なお、現在 (2023-06-17) の BIRD はバージョン 1 系と 2 系が平行してメンテナンスされているが、今回使うのはバージョン 2 系である。
今回のエントリは、以下のエントリの OSPFv2 を使ったバージョンになっている。 そのため、こちらに先に目を通しておくと内容を理解しやすい。
使った環境は次のとおり。
$ cat /etc/lsb-release
DISTRIB_ID=Ubuntu
DISTRIB_RELEASE=22.04
DISTRIB_CODENAME=jammy
DISTRIB_DESCRIPTION="Ubuntu 22.04.2 LTS"
$ uname -srm
Linux 5.15.0-73-generic x86_64
$ bird --version
BIRD version 2.0.8
もくじ
下準備
まずは BIRD のバージョン 2 系をインストールする。
$ sudo apt-get update
$ sudo apt-get install bird2
インストールすると同時に BIRD のサービスが動作し始める。 しかし、今回は systemd 経由では BIRD を使わないため止めておく。
$ sudo systemctl stop bird
$ sudo systemctl disable bird
ネットワークを構築する
はじめに Network Namespace を使ってネットワークを構築する。 今回作るのは、以下のようなネットワークになる。 先のスタティックルーティングの構成と変わらない。
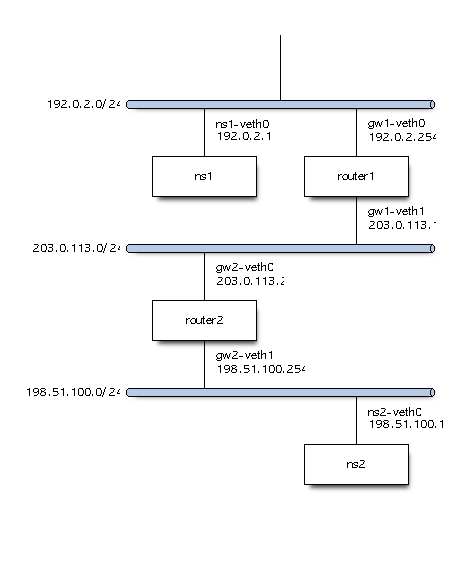
上記で、router1 は 198.51.100.0/24 と直接はつながっていないため経路を知らない。
同様に、router2 は 192.0.2.0/24 と直接はつながっていないため経路を知らない。
そこで、BIRD の OSPFv2 を使って経路を交換するのが今回の目的になる。
まずは Network Namespace を用意する。
$ sudo ip netns add ns1
$ sudo ip netns add router1
$ sudo ip netns add router2
$ sudo ip netns add ns2
Network Namespace 間をつなぐ Virtual Ethernet Device のインターフェイスを用意する。
$ sudo ip link add ns1-veth0 type veth peer name gw1-veth0
$ sudo ip link add gw1-veth1 type veth peer name gw2-veth0
$ sudo ip link add gw2-veth1 type veth peer name ns2-veth0
作成したインターフェイスを Network Namespace に所属させる。
$ sudo ip link set ns1-veth0 netns ns1
$ sudo ip link set gw1-veth0 netns router1
$ sudo ip link set gw1-veth1 netns router1
$ sudo ip link set gw2-veth0 netns router2
$ sudo ip link set gw2-veth1 netns router2
$ sudo ip link set ns2-veth0 netns ns2
それぞれのインターフェイスをリンクアップさせる。
$ sudo ip netns exec ns1 ip link set ns1-veth0 up
$ sudo ip netns exec router1 ip link set gw1-veth0 up
$ sudo ip netns exec router1 ip link set gw1-veth1 up
$ sudo ip netns exec router2 ip link set gw2-veth0 up
$ sudo ip netns exec router2 ip link set gw2-veth1 up
$ sudo ip netns exec ns2 ip link set ns2-veth0 up
それぞれのインターフェイスに IP アドレスを付与する。
$ sudo ip netns exec ns1 ip address add 192.0.2.1/24 dev ns1-veth0
$ sudo ip netns exec router1 ip address add 192.0.2.254/24 dev gw1-veth0
$ sudo ip netns exec router1 ip address add 203.0.113.1/24 dev gw1-veth1
$ sudo ip netns exec router2 ip address add 203.0.113.2/24 dev gw2-veth0
$ sudo ip netns exec router2 ip address add 198.51.100.254/24 dev gw2-veth1
$ sudo ip netns exec ns2 ip address add 198.51.100.1/24 dev ns2-veth0
ホストに相当する Network Namespace にはデフォルトルートを設定しておく。
$ sudo ip netns exec ns1 ip route add default via 192.0.2.254
$ sudo ip netns exec ns2 ip route add default via 198.51.100.254
そして、ルータになる Network Namespace は IPv4 のルーティングを有効にする。
$ sudo ip netns exec router1 sysctl net.ipv4.ip_forward=1
$ sudo ip netns exec router2 sysctl net.ipv4.ip_forward=1
この状態で、それぞれのルータは自身が直接つながっているセグメントへの経路は把握している。
$ sudo ip netns exec router1 ip route show
192.0.2.0/24 dev gw1-veth0 proto kernel scope link src 192.0.2.254
203.0.113.0/24 dev gw1-veth1 proto kernel scope link src 203.0.113.1
しかし、直接つながっていないセグメントへの経路がないため ns1 から ns2 の間で ping(8) は通らない。
$ sudo ip netns exec ns1 ping -c 3 198.51.100.1 -I 192.0.2.1
PING 198.51.100.1 (198.51.100.1) from 192.0.2.1 : 56(84) bytes of data.
From 192.0.2.254 icmp_seq=1 Destination Net Unreachable
From 192.0.2.254 icmp_seq=2 Destination Net Unreachable
From 192.0.2.254 icmp_seq=3 Destination Net Unreachable

--- 198.51.100.1 ping statistics ---
3 packets transmitted, 0 received, +3 errors, 100% packet loss, time 2041ms
router1 の BIRD を設定する
まずは router1 の BIRD を設定する。
以下のように BIRD の設定ファイルを用意する。
$ cat << 'EOF' > router1.conf
log syslog all;
log stderr all;
log "/var/log/bird-router1.log" all;
debug protocols all;

router id 203.0.113.1;

protocol device {
}

protocol direct {
    ipv4;
}

protocol ospf v2 {
    ipv4 {
        import all;
        export all;
    };
    area 0 {
        interface "gw1-veth1" {
        };
    };
}

protocol kernel {
    ipv4 {
        export filter {
            if proto = "direct1" then reject;
            accept;
        };
    };
}
EOF
スタティックルーティングの場合から変わっている部分として、まず direct プロトコルがある。 これは、自身が直接つながって知っているネットワークに関する情報を BIRD のルーティングテーブルに取り込む機能になっている。 デフォルトでは disabled; が設定されており、有効にするときは ipv4; や ipv6; を指定して使う。 今回は直接つながっているネットワークの中で IPv4 の情報を取り込んで OSPF で広告したいので ipv4; を有効にしている。
protocol direct {
    ipv4;
}
そして、今回の主題となる OSPF を設定しているのが以下の部分。
ipv4 の import all は OSPF で得られるすべての経路を BIRD のルーティングテーブルに取り込むという意味になる。
同様に export all は、BIRD の知っているすべての経路を OSPF で他のルータに広告するという意味になる。
area 0 は、定義しているのがいわゆるバックボーンエリアであることを示している。
その中で指定している interface "gw1-veth1" は、経路を交換するインターフェイスを指定している。
protocol ospf v2 {
    ipv4 {
        import all;
        export all;
    };
    area 0 {
        interface "gw1-veth1" {
        };
    };
}
設定ファイルができたら BIRD を起動する。
-d オプションを指定すると、フォアグラウンドでデバッグログを標準エラー出力に出すように起動する。
オプションをつけなければ、端末を切り離してデーモンとして動作する。
$ sudo ip netns exec router1 bird -d \
    -c router1.conf \
    -s router1.ctl \
    -P router1.pid
router2 の BIRD を設定する
同様に router2 についても設定ファイルを用意する。
$ cat << 'EOF' > router2.conf
log syslog all;
log stderr all;
log "/var/log/bird-router2.log" all;
debug protocols all;

router id 203.0.113.2;

protocol device {
}

protocol direct {
    ipv4;
}

protocol ospf v2 {
    ipv4 {
        import all;
        export all;
    };
    area 0 {
        interface "gw2-veth0" {
        };
    };
}

protocol kernel {
    ipv4 {
        export filter {
            if proto = "direct1" then reject;
            accept;
        };
    };
}
EOF
BIRD を動かし始める前に、もしルータ同士のやり取りを最初から観察したいのであれば、あらかじめ tcpdump(1) を起動しておくと良い。 OSPFv2 はトランスポートのプロトコルを挟まずに、直接 IP のプロトコル番号 89 として動作する。 そのため、次のようにして通信を観察できる。
$ sudo ip netns exec router1 tcpdump -tnlvvv -i gw1-veth1 "ip proto 89"
そして router2 の BIRD を実行する。
$ sudo ip netns exec router2 bird -d \
    -c router2.conf \
    -s router2.ctl \
    -P router2.pid
動作を確認する
OSPFv2 では、次のようなメッセージを使って経路の情報を交換する。
- Hello
- Database Description (DBD)
- Link State Request (LSR)
- Link State Update (LSU)
- Link State Acknowledgement (LSAck)
ここからは tcpdump でキャプチャしたパケットを時系列で見ていく。
まず、OSPF のルータは近隣のルータを検出するために Hello パケットをマルチキャスト宛に送る。
以下のパケットをキャプチャしたタイミングは router1 が先に起動していて、router2 が起動した直後の状態。
まだ router1 と router2 はお互いを Neighbor として認識しておらず、このパケットを契機に処理が進む。
先に起動していた router1 は、Hello パケットで自身を Designated Router として広告している。
IP (tos 0xc0, ttl 1, id 12536, offset 0, flags [none], proto OSPF (89), length 64)
    203.0.113.2 > 224.0.0.5: OSPFv2, Hello, length 44
    Router-ID 203.0.113.2, Backbone Area, Authentication Type: none (0)
    Options [External]
      Hello Timer 10s, Dead Timer 40s, Mask 255.255.255.0, Priority 1
IP (tos 0xc0, ttl 1, id 60951, offset 0, flags [none], proto OSPF (89), length 68)
    203.0.113.1 > 224.0.0.5: OSPFv2, Hello, length 48
    Router-ID 203.0.113.1, Backbone Area, Authentication Type: none (0)
    Options [External]
      Hello Timer 10s, Dead Timer 40s, Mask 255.255.255.0, Priority 1
      Designated Router 203.0.113.1
      Neighbor List:
        203.0.113.2
上記の Hello パケットで、それぞれ Neighbor として認識したため DBD を送り合っている。
IP (tos 0xc0, ttl 1, id 20778, offset 0, flags [none], proto OSPF (89), length 52)
    203.0.113.2 > 203.0.113.1: OSPFv2, Database Description, length 32
    Router-ID 203.0.113.2, Backbone Area, Authentication Type: none (0)
    Options [External, Opaque], DD Flags [Init, More, Master], MTU: 1500, Sequence: 0x645fe66f
IP (tos 0xc0, ttl 1, id 40524, offset 0, flags [none], proto OSPF (89), length 112)
    203.0.113.1 > 203.0.113.2: OSPFv2, Database Description, length 92
    Router-ID 203.0.113.1, Backbone Area, Authentication Type: none (0)
    Options [External, Opaque], DD Flags [none], MTU: 1500, Sequence: 0x645fe66f
      Advertising Router 203.0.113.1, seq 0x80000001, age 849s, length 16
        External LSA (5), LSA-ID: 192.0.2.255
        Options: [External]
      Advertising Router 203.0.113.1, seq 0x80000001, age 849s, length 16
        External LSA (5), LSA-ID: 203.0.113.0
        Options: [External]
      Advertising Router 203.0.113.1, seq 0x80000001, age 849s, length 16
        Router LSA (1), LSA-ID: 203.0.113.1
        Options: [External, Opaque]
IP (tos 0xc0, ttl 1, id 20779, offset 0, flags [none], proto OSPF (89), length 112)
    203.0.113.2 > 203.0.113.1: OSPFv2, Database Description, length 92
    Router-ID 203.0.113.2, Backbone Area, Authentication Type: none (0)
    Options [External, Opaque], DD Flags [Master], MTU: 1500, Sequence: 0x645fe670
      Advertising Router 203.0.113.2, seq 0x80000001, age 4s, length 16
        External LSA (5), LSA-ID: 203.0.113.0
        Options: [External]
      Advertising Router 203.0.113.2, seq 0x80000001, age 4s, length 16
        External LSA (5), LSA-ID: 198.51.100.255
        Options: [External]
      Advertising Router 203.0.113.2, seq 0x80000001, age 4s, length 16
        Router LSA (1), LSA-ID: 203.0.113.2
        Options: [External, Opaque]
IP (tos 0xc0, ttl 1, id 40525, offset 0, flags [none], proto OSPF (89), length 52)
    203.0.113.1 > 203.0.113.2: OSPFv2, Database Description, length 32
    Router-ID 203.0.113.1, Backbone Area, Authentication Type: none (0)
    Options [External, Opaque], DD Flags [none], MTU: 1500, Sequence: 0x645fe670
DBD を見て、自身が持っていない LSA (Link State Advertisement) について LSR を送っている。
IP (tos 0xc0, ttl 1, id 40526, offset 0, flags [none], proto OSPF (89), length 80)
    203.0.113.1 > 203.0.113.2: OSPFv2, LS-Request, length 60
    Router-ID 203.0.113.1, Backbone Area, Authentication Type: none (0)
      Advertising Router: 203.0.113.2, External LSA (5), LSA-ID: 203.0.113.0
      Advertising Router: 203.0.113.2, External LSA (5), LSA-ID: 198.51.100.255
      Advertising Router: 203.0.113.2, Router LSA (1), LSA-ID: 203.0.113.2
IP (tos 0xc0, ttl 1, id 20780, offset 0, flags [none], proto OSPF (89), length 80)
    203.0.113.2 > 203.0.113.1: OSPFv2, LS-Request, length 60
    Router-ID 203.0.113.2, Backbone Area, Authentication Type: none (0)
      Advertising Router: 203.0.113.1, External LSA (5), LSA-ID: 192.0.2.255
      Advertising Router: 203.0.113.1, External LSA (5), LSA-ID: 203.0.113.0
      Advertising Router: 203.0.113.1, Router LSA (1), LSA-ID: 203.0.113.1
そして LSR で要求された LSA を含んだ LSU を返している。
IP (tos 0xc0, ttl 1, id 40527, offset 0, flags [none], proto OSPF (89), length 156)
    203.0.113.1 > 203.0.113.2: OSPFv2, LS-Update, length 136
    Router-ID 203.0.113.1, Backbone Area, Authentication Type: none (0), 3 LSAs
      LSA #1
      Advertising Router 203.0.113.1, seq 0x80000001, age 850s, length 16
        External LSA (5), LSA-ID: 192.0.2.255
        Options: [External]
        Mask 255.255.255.0
        topology default (0), type 2, metric 10000
        0x0000:  ffff ff00 8000 2710 0000 0000 0000 0000
      LSA #2
      Advertising Router 203.0.113.1, seq 0x80000001, age 850s, length 16
        External LSA (5), LSA-ID: 203.0.113.0
        Options: [External]
        Mask 255.255.255.0
        topology default (0), type 2, metric 10000
        0x0000:  ffff ff00 8000 2710 0000 0000 0000 0000
      LSA #3
      Advertising Router 203.0.113.1, seq 0x80000001, age 850s, length 16
        Router LSA (1), LSA-ID: 203.0.113.1
        Options: [External, Opaque]
        Router LSA Options: [ASBR]
          Stub Network: 203.0.113.0, Mask: 255.255.255.0
        topology default (0), metric 10
        0x0000:  0200 0001 cb00 7100 ffff ff00 0300 000a
IP (tos 0xc0, ttl 1, id 20781, offset 0, flags [none], proto OSPF (89), length 156)
    203.0.113.2 > 203.0.113.1: OSPFv2, LS-Update, length 136
    Router-ID 203.0.113.2, Backbone Area, Authentication Type: none (0), 3 LSAs
      LSA #1
      Advertising Router 203.0.113.2, seq 0x80000001, age 5s, length 16
        External LSA (5), LSA-ID: 203.0.113.0
        Options: [External]
        Mask 255.255.255.0
        topology default (0), type 2, metric 10000
        0x0000:  ffff ff00 8000 2710 0000 0000 0000 0000
      LSA #2
      Advertising Router 203.0.113.2, seq 0x80000001, age 5s, length 16
        External LSA (5), LSA-ID: 198.51.100.255
        Options: [External]
        Mask 255.255.255.0
        topology default (0), type 2, metric 10000
        0x0000:  ffff ff00 8000 2710 0000 0000 0000 0000
      LSA #3
      Advertising Router 203.0.113.2, seq 0x80000001, age 5s, length 16
        Router LSA (1), LSA-ID: 203.0.113.2
        Options: [External, Opaque]
        Router LSA Options: [ASBR]
          Stub Network: 203.0.113.0, Mask: 255.255.255.0
        topology default (0), metric 10
        0x0000:  0200 0001 cb00 7100 ffff ff00 0300 000a
IP (tos 0xc0, ttl 1, id 61162, offset 0, flags [none], proto OSPF (89), length 116)
    203.0.113.1 > 224.0.0.5: OSPFv2, LS-Update, length 96
    Router-ID 203.0.113.1, Backbone Area, Authentication Type: none (0), 2 LSAs
      LSA #1
      Advertising Router 203.0.113.1, seq 0x80000002, age 1s, length 16
        Router LSA (1), LSA-ID: 203.0.113.1
        Options: [External, Opaque]
        Router LSA Options: [ASBR]
          Neighbor Network-ID: 203.0.113.1, Interface Address: 203.0.113.1
        topology default (0), metric 10
        0x0000:  0200 0001 cb00 7101 cb00 7101 0200 000a
      LSA #2
      Advertising Router 203.0.113.1, seq 0x80000001, age 1s, length 12
        Network LSA (2), LSA-ID: 203.0.113.1
        Options: [External, Opaque]
        Mask 255.255.255.0
        Connected Routers:
          203.0.113.1
          203.0.113.2
        0x0000:  ffff ff00 cb00 7101 cb00 7102
IP (tos 0xc0, ttl 1, id 12621, offset 0, flags [none], proto OSPF (89), length 84)
    203.0.113.2 > 224.0.0.5: OSPFv2, LS-Update, length 64
    Router-ID 203.0.113.2, Backbone Area, Authentication Type: none (0), 1 LSA
      LSA #1
      Advertising Router 203.0.113.2, seq 0x80000002, age 1s, length 16
        Router LSA (1), LSA-ID: 203.0.113.2
        Options: [External, Opaque]
        Router LSA Options: [ASBR]
              Neighbor Network-ID: 203.0.113.1, Interface Address: 203.0.113.2
        topology default (0), metric 10
        0x0000:  0200 0001 cb00 7101 cb00 7102 0200 000a
最後に、LSU の受信確認として LSAck を返している。
IP (tos 0xc0, ttl 1, id 12883, offset 0, flags [none], proto OSPF (89), length 144)
    203.0.113.2 > 224.0.0.5: OSPFv2, LS-Ack, length 124
    Router-ID 203.0.113.2, Backbone Area, Authentication Type: none (0)
      Advertising Router 203.0.113.1, seq 0x80000001, age 850s, length 16
        External LSA (5), LSA-ID: 192.0.2.255
        Options: [External]
      Advertising Router 203.0.113.1, seq 0x80000001, age 850s, length 16
        External LSA (5), LSA-ID: 203.0.113.0
        Options: [External]
      Advertising Router 203.0.113.1, seq 0x80000001, age 850s, length 16
        Router LSA (1), LSA-ID: 203.0.113.1
        Options: [External, Opaque]
      Advertising Router 203.0.113.1, seq 0x80000002, age 1s, length 16
        Router LSA (1), LSA-ID: 203.0.113.1
        Options: [External, Opaque]
      Advertising Router 203.0.113.1, seq 0x80000001, age 1s, length 12
        Network LSA (2), LSA-ID: 203.0.113.1
        Options: [External, Opaque] [|ospf2]
IP (tos 0xc0, ttl 1, id 61508, offset 0, flags [none], proto OSPF (89), length 124)
    203.0.113.1 > 224.0.0.5: OSPFv2, LS-Ack, length 104
    Router-ID 203.0.113.1, Backbone Area, Authentication Type: none (0)
      Advertising Router 203.0.113.2, seq 0x80000001, age 5s, length 16
        External LSA (5), LSA-ID: 203.0.113.0
        Options: [External]
      Advertising Router 203.0.113.2, seq 0x80000001, age 5s, length 16
        External LSA (5), LSA-ID: 198.51.100.255
        Options: [External]
      Advertising Router 203.0.113.2, seq 0x80000001, age 5s, length 16
        Router LSA (1), LSA-ID: 203.0.113.2
        Options: [External, Opaque]
      Advertising Router 203.0.113.2, seq 0x80000002, age 1s, length 16
        Router LSA (1), LSA-ID: 203.0.113.2
        Options: [External, Opaque] [|ospf2]
さて、BIRD のルーティングテーブルを確認すると、ちゃんと経路交換で得られた経路が入っている。
router1 は、直接つながっていないために知らないはずの 198.51.100.0/24 が 203.0.113.2 経由で到達できるとある。
$ sudo birdc show route -s router1.ctl
BIRD 2.0.8 ready.
Table master4:
198.51.100.0/24      unicast [ospf1 06:32:48.103] * E2 (150/10/10000) [203.0.113.2]
    via 203.0.113.2 on gw1-veth1
192.0.2.0/24         unicast [direct1 06:18:36.005] * (240)
    dev gw1-veth0
203.0.113.0/24       unicast [direct1 06:18:36.005] * (240)
    dev gw1-veth1
                     unicast [ospf1 06:18:36.103] I (150/10) [203.0.113.1]
    dev gw1-veth1
次のようにカーネルのルーティングテーブルにも、それが反映されている。
$ sudo ip netns exec router1 ip route show
192.0.2.0/24 dev gw1-veth0 proto kernel scope link src 192.0.2.254
198.51.100.0/24 via 203.0.113.2 dev gw1-veth1 proto bird metric 32
203.0.113.0/24 dev gw1-veth1 proto kernel scope link src 203.0.113.1
BIRD の動作状況は次のとおり。
$ sudo birdc show protocols all -s router1.ctl
BIRD 2.0.8 ready.
Name       Proto      Table      State  Since         Info
device1    Device     ---        up     06:18:36.002

direct1    Direct     ---        up     06:18:36.002
  Channel ipv4
    State:          UP
    Table:          master4
    Preference:     240
    Input filter:   ACCEPT
    Output filter:  REJECT
    Routes:         2 imported, 0 exported, 2 preferred
    Route change stats:     received   rejected   filtered    ignored   accepted
      Import updates:              2          0          0          0          2
      Import withdraws:            0          0        ---          0          0
      Export updates:              0          0          0        ---          0
      Export withdraws:            0        ---        ---        ---          0

ospf1      OSPF       master4    up     06:18:36.002  Running
  Channel ipv4
    State:          UP
    Table:          master4
    Preference:     150
    Input filter:   ACCEPT
    Output filter:  ACCEPT
    Routes:         2 imported, 2 exported, 1 preferred
    Route change stats:     received   rejected   filtered    ignored   accepted
      Import updates:              2          0          0          0          2
      Import withdraws:            0          0        ---          0          0
      Export updates:              5          1          0        ---          4
      Export withdraws:            0        ---        ---        ---          0

kernel1    Kernel     master4    up     06:18:36.002
  Channel ipv4
    State:          UP
    Table:          master4
    Preference:     10
    Input filter:   ACCEPT
    Output filter:  (unnamed)
    Routes:         0 imported, 1 exported, 0 preferred
    Route change stats:     received   rejected   filtered    ignored   accepted
      Import updates:              0          0          0          0          0
      Import withdraws:            0          0        ---          0          0
      Export updates:              5          0          4        ---          1
      Export withdraws:            0        ---        ---        ---          0
最後に、最初は経路が足りなくて動作しなかった ns1 から ns2 に ping を打ってみよう。
$ sudo ip netns exec ns1 ping -c 3 198.51.100.1 -I 192.0.2.1
PING 198.51.100.1 (198.51.100.1) from 192.0.2.1 : 56(84) bytes of data.
64 bytes from 198.51.100.1: icmp_seq=1 ttl=62 time=0.145 ms
64 bytes from 198.51.100.1: icmp_seq=2 ttl=62 time=0.104 ms
64 bytes from 198.51.100.1: icmp_seq=3 ttl=62 time=0.099 ms

--- 198.51.100.1 ping statistics ---
3 packets transmitted, 3 received, 0% packet loss, time 2026ms
rtt min/avg/max/mdev = 0.099/0.116/0.145/0.020 ms
ちゃんと疎通が得られた。
まとめ
今回は Network Namespace で構築したネットワーク上で BIRD を動かし、OSPFv2 を使ったダイナミックルーティングを試してみた。
