Ultrastar DC HC シリーズは、Western Digital に買収された HGST が製造しているエンタープライズ向けの製品になる。
つまり、ウワサが本当であれば、この製品はコンシューマ向けにもかかわらず、内部にはエンタープライズ向けの HDD (の廉価版) が使われていることになる。
ようするに、企業のデータセンターの中でサーバに使うような高信頼モデル 1 ということ。
$ python flights.py
index of train: [ 01234567891011121314151617181920212223]
index of test: [242526272829303132333435363738394041424344454647]
----------
index of train: [ 01234567891011121314151617181920212223242526272829303132333435363738394041424344454647]
index of test: [484950515253545556575859606162636465666768697071]
----------
index of train: [ 01234567891011121314151617181920212223242526272829303132333435363738394041424344454647484950515253545556575859606162636465666768697071]
index of test: [727374757677787980818283848586878889909192939495]
----------
index of train: [ 01234567891011121314151617181920212223242526272829303132333435363738394041424344454647484950515253545556575859606162636465666768697071727374757677787980818283848586878889909192939495]
index of test: [ 96979899100101102103104105106107108109110111112113114115116117118119]
----------
index of train: [ 0123456789101112131415161718192021222324252627282930313233343536373839404142434445464748495051525354555657585960616263646566676869707172737475767778798081828384858687888990919293949596979899100101102103104105106107108109110111112113114115116117118119]
index of test: [120121122123124125126127128129130131132133134135136137138139140141142143]
----------
$ python shuffledflights.py
index of train: [ 01234567891011121314151617181920212223]
index of test: [242526272829303132333435363738394041424344454647]
----------
index of train: [ 01234567891011121314151617181920212223242526272829303132333435363738394041424344454647]
index of test: [484950515253545556575859606162636465666768697071]
----------
index of train: [ 01234567891011121314151617181920212223242526272829303132333435363738394041424344454647484950515253545556575859606162636465666768697071]
index of test: [727374757677787980818283848586878889909192939495]
----------
index of train: [ 01234567891011121314151617181920212223242526272829303132333435363738394041424344454647484950515253545556575859606162636465666768697071727374757677787980818283848586878889909192939495]
index of test: [ 96979899100101102103104105106107108109110111112113114115116117118119]
----------
index of train: [ 0123456789101112131415161718192021222324252627282930313233343536373839404142434445464748495051525354555657585960616263646566676869707172737475767778798081828384858687888990919293949596979899100101102103104105106107108109110111112113114115116117118119]
index of test: [120121122123124125126127128129130131132133134135136137138139140141142143]
----------
Luigi は、Python を使って実装された、バッチ処理のパイプラインを扱うためのフレームワーク。
Luigi でパイプラインを定義するときは、基本的には個別のタスクを依存関係でつないでいくことになる。
このとき、扱う処理によってはパイプラインは長大になると共に扱うパラメータの数も増える。
そうすると、依存関係で上流にあるタスクに対して、どのようにパラメータを渡すか、という問題が生じる。
$ python example.py
...(省略)...
===== Luigi Execution Summary =====
Scheduled 2 tasks of which:
* 2 ran successfully:
-1 DownstreamTask(downstream_task_param=downstream, upstream_task_param=upstream)
-1 UpstreamTask(upstream_task_param=upstream)
This progress looks :) because there were no failed tasks or missing dependencies
===== Luigi Execution Summary =====
$ python example.py
...(省略)...
===== Luigi Execution Summary =====
Scheduled 2 tasks of which:
* 2 ran successfully:
-1 DownstreamTask(downstream_task_param=downstream)
-1 UpstreamTask(upstream_task_param=upstream)
This progress looks :) because there were no failed tasks or missing dependencies
===== Luigi Execution Summary =====
$ python example.py
...(省略)...
===== Luigi Execution Summary =====
Scheduled 2 tasks of which:
* 2 ran successfully:
-1 DownstreamTask(upstream_task_param=upstream, downstream_task_param=downstream)
-1 UpstreamTask(upstream_task_param=upstream)
This progress looks :) because there were no failed tasks or missing dependencies
===== Luigi Execution Summary =====
$ cat /etc/lsb-release
DISTRIB_ID=Ubuntu
DISTRIB_RELEASE=18.04
DISTRIB_CODENAME=bionic
DISTRIB_DESCRIPTION="Ubuntu 18.04.4 LTS"
$ uname -r
4.15.0-76-generic
$ dpkg -l | egrep "(radvd|dnsmasq|isc-dhcp-client)"
ii  dnsmasq                         2.79-1                              all          Small caching DNS proxy and DHCP/TFTP server
ii  dnsmasq-base                    2.79-1                              amd64        Small caching DNS proxy and DHCP/TFTP server
ii  isc-dhcp-client                 4.3.5-3ubuntu7.1                    amd64        DHCP client for automatically obtaining an IP address
ii  radvd                           1:2.16-3                            amd64        Router Advertisement Daemon
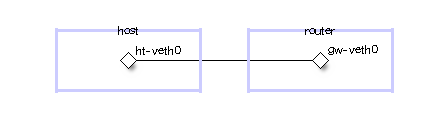
$ sudo ip netns add host
$ sudo ip netns add router
そして、Network Namespace 同士をつなぐ veth インターフェイスを作る。
$ sudo ip link add ht-veth0 type veth peer name gw-veth0
作ったインターフェイスを Network Namespace に所属させる。
$ sudo ip link set ht-veth0 netns host
$ sudo ip link set gw-veth0 netns router
デフォルトでは EUI-64 を使ってアドレスの下位 64 ビットが生成されるため、わかりやすいように MAC アドレスを変更しておく。
$ sudo ip netns exec host ip link set dev ht-veth0 address 00:00:5E:00:53:01
$ sudo ip netns exec router ip link set dev gw-veth0 address 00:00:5E:00:53:02
veth インターフェイスの状態を UP に設定する。
$ sudo ip netns exec host ip link set ht-veth0 up
$ sudo ip netns exec router ip link set gw-veth0 up
$ sudo ip netns exec host ip address show dynamic ht-veth0
11: ht-veth0@if10: <BROADCAST,MULTICAST,UP,LOWER_UP> mtu 1500 qdisc noqueue state UP group default qlen 1000
    link/ether 00:00:5e:00:53:01 brd ff:ff:ff:ff:ff:ff link-netnsid 1
    inet6 2001:db8::200:5eff:fe00:5301/64 scope global dynamic mngtmpaddr
       valid_lft 86379sec preferred_lft 14379sec
また、同時にルータ広告を送ってきたリンクローカルアドレスにデフォルトルートを設定する。
$ sudo ip netns exec host ip -6 route show
2001:db8::/64 dev ht-veth0 proto kernel metric 256 expires 86388sec pref medium
fe80::/64 dev ht-veth0 proto kernel metric 256 pref medium
default via fe80::1 dev ht-veth0 proto ra metric 1024 expires 1788sec hoplimit 64 pref medium
RDNSS の設定を追加してみる
RA の基本的な動作が確認できたので、つづいては RDNSS の設定を追加してパケットを観察してみる。
radvd の設定ファイルに RDNSS の設定を追加する。
配布する DNS サーバのアドレスは 2001:db8::dead:beef に指定した。


")